Comm100 now supports the integration of its Chatbot with third-party Live Chat channels like Zendesk. This integration will allow you to provide faster and better services to your visitors. The integration can come in handy in the following scenarios:
- If you are already using the Comm100 Chatbot, and wish to use zendesk chat.
- If you are already using zendesk chat and are looking to integrate with a capable Chatbot.
This article guides you with the steps you need to perform to integrate zendesk chat with the Comm100 Chatbot. You would need to perform steps on your Zendesk account as well as the Comm100 Control Panel.
Step by Step Instructions
To integrate Comm100 Chatbot with Zendesk, follow these steps:
- Generate Client ID from your Zendesk account:
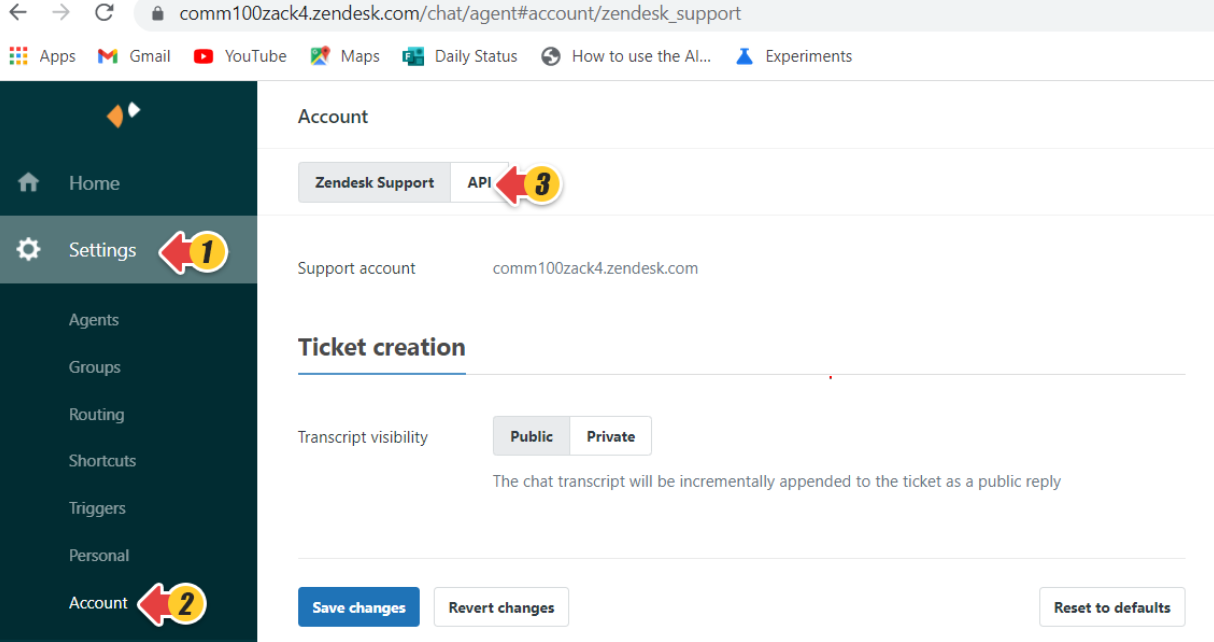
- Log in to your Zendesk account.
- Go to the Zendesk Products icon on the top right of the Zendesk platform and select Chat.Note: You may be using both chat and messages in your Zendesk account to communicate with your visitors. However, to integrate zendesk chat with Comm100 Chatbot, you must enable Chat from Settings > Channels > Web Widget.
- Go to Settings > Account > API.
- Click the Add API client button.
- Add the necessary details like Client name, Company, Redirect URLs, and click the Create API client button. Once the API client is created, a client ID is generated. Note: The Redirect URL depends on your website and can vary from website to website. For example, “https://indbotdash.testing.comm100dev.io/" is the link for the Comm100 Chatbot platform. You should copy your Chatbot platform link here.
- Copy your client ID and save it for future references.Note: One Zendesk agent account can be used to create only one Client ID at a time, for the Comm100 Chatbot. If you create more than one Client ID with the same Zendesk agent account for the Comm100 Chatbot, the previously created Client ID gets disabled automatically. You would need to replace the old Client ID with the new one to fix the issue.
- Integrate Zendesk account with Chatbot from Comm100 Control Panel:
- Log in to the Comm100 Control Panel.
- Go to Apps & Integrations.
- On the Apps & Integrations page, go to zendesk chat.
- On the Zendesk Chat page, click the Add Zendesk Chat Agent button.
- On the Add Zendesk Chat Agent page, add the following details and click Authorize.
- Zendesk Client ID: The ID that was generated while creating the API client.
- Subdomain: Your Zendesk Subdomain.
- On the Authorization page, click Allow to provide access to the Comm100 Chatbot to your Zendesk Chat Account.
Once you allow access to the Chatbot, the status on your Comm100 account changes to Authorized. Once the authorization is completed and you create a new Client ID from your Zendesk agent account for the Comm100 Chatbot, the authorization gets disabled. You will need to replace the Zendesk Client ID with the latest Client ID and authorize it again. - You can choose any existing Chatbot or create a new one for the Zendesk Chat channel.
- Click Save.


You are now ready to use the Comm100 Chatbot on your Zendesk Chat.
