Conditions are a step, which can be used within a chatbot answer flow that changes the path a visitor will take based on information about them. In Comm100, you can add Conditions via the Conditions card in the Intents-Answers and Event Messages flow builder.
A Conditions card contains the following part:
| Parts | Description |
Multiple Branches | You can add multiple branches in a Conditions action. Each branch leads to a different branch. Each branch is checked in sequential order, and there is no limit to add these branches. | |
Multiple Conditions | You can add multiple conditions within a branch. These conditions can be combined by multiple "And" or "Or" or "Logical Expression". | |
 | Default Branch | You have Any other condition as a default branch on the Conditions card. |
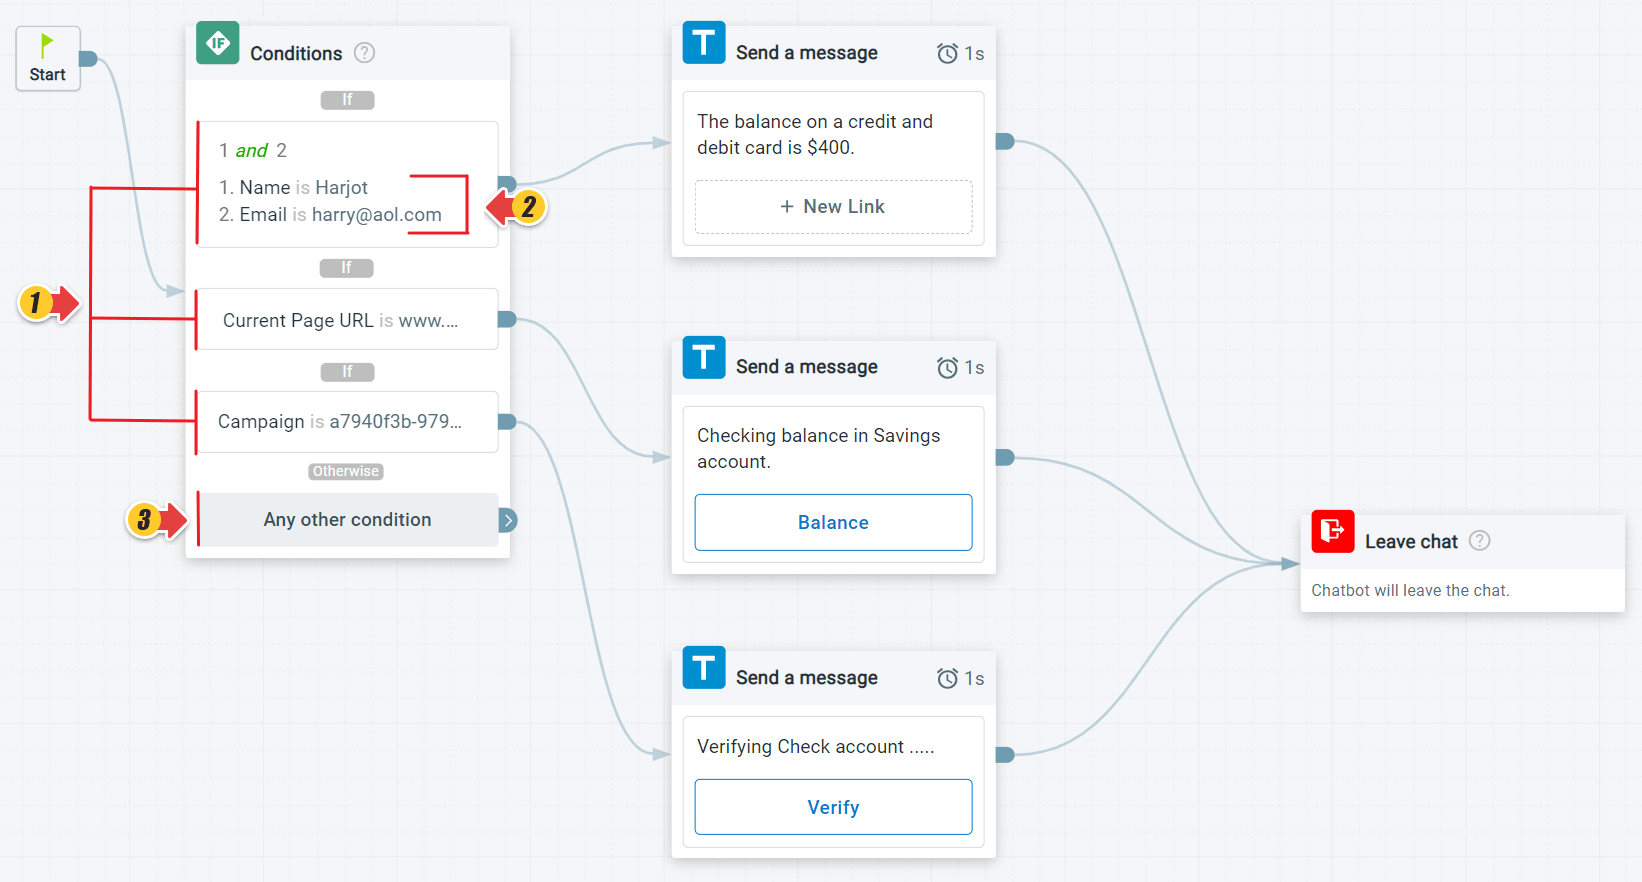
Comm100 verifies the Condition in the sequence in which they are listed and then determines which branch a visitor shall take within the flow.
Operator Types for Conditions
The following operator types are available for creating conditions in the Conditions card. These operator types are dynamic and vary based on the field you choose:
- is
- is not
- contains
- does not contain
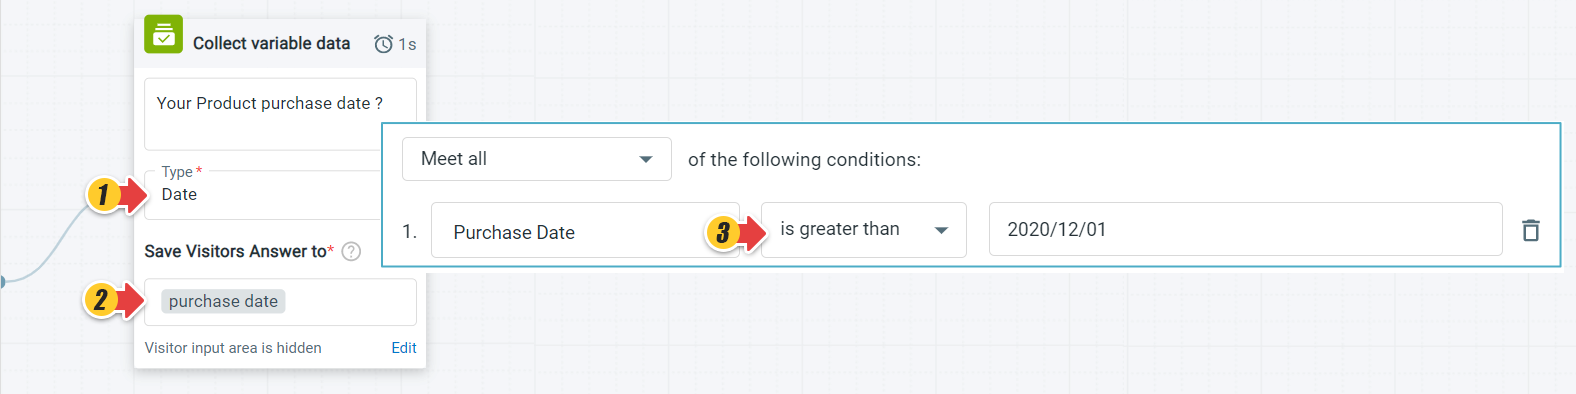
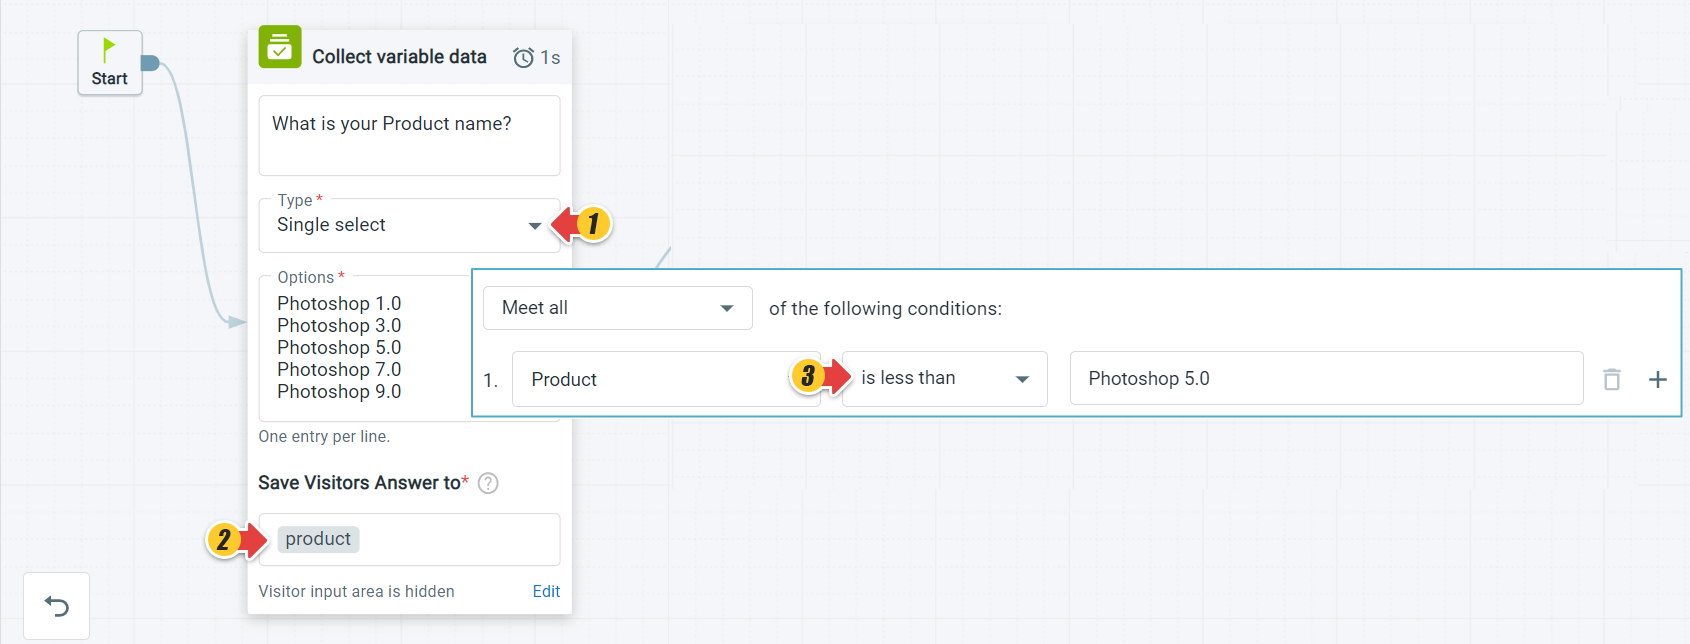
- is greater than
- is less than
- meets regular expression
- is more than
- is less than
- before
- after
When you are using Variable fields, the following scenario can occur:
- If your Variable field is with Date type, you can manually input the value: @Today; @1 day ago; @7 days ago; @15 days ago; @30 days ago. If you'd like to enter a specific date, the acceptable date format is YYYY/MM/DD.
- If your Variable field is with Time type, you can manually input a specific time, the acceptable time format is HH:MM:SS AM/PM (am/pm is also accepted). The time zone is the site time zone.
For the operator types, the operator type is greater than will be run as Before and is less than as After. - If your Variable field is with Text, Text area, Single select, Multiple select, Email, Password type, the result follows the ASCII rule.
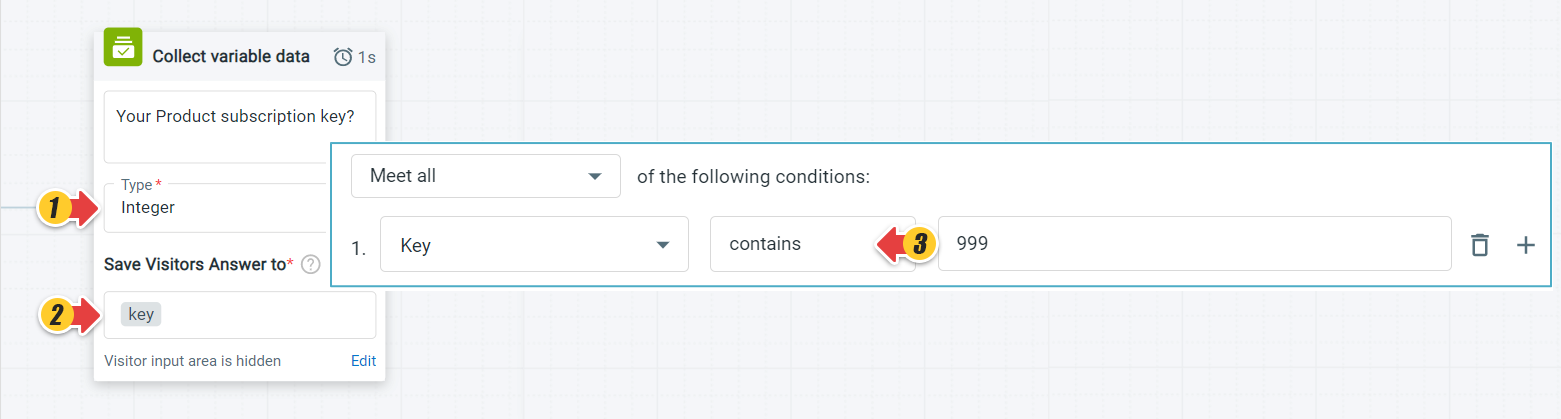
- If your Variable field is with Integer or Decimal type with operator type contains and does not contain, the result shall be that the system can retrieve some digits from a string.

Conditional fields visible for Live Chat and Social Channels
The data that can be used to define conditions include website browsing behavior, visitor segment, pre-chat survey answers, and Ticketing & Messaging fields.
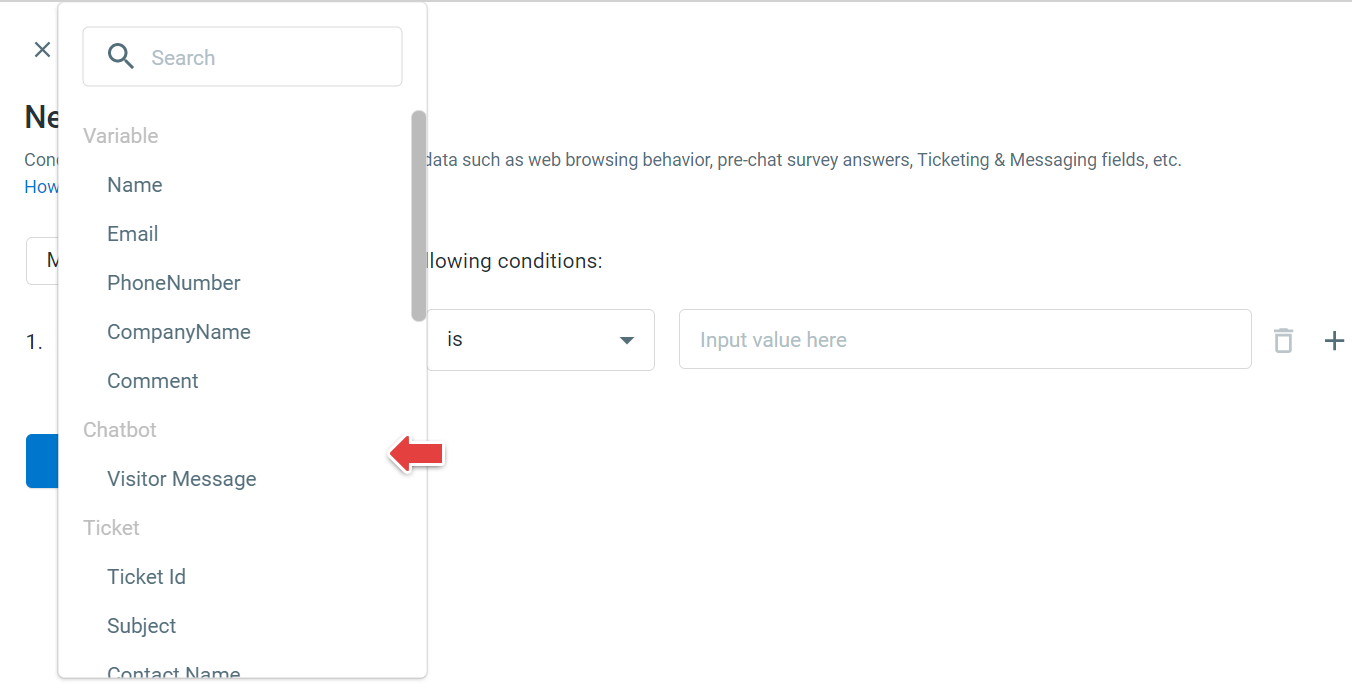
The following table list the fields visible in the New Condition or Edit Condition drawers for the Live Chat and Ticketing & Messaging channels.
Live Chat | Facebook Messenger | Twitter Direct Message | SMS | |||
Variable | √ | √ | √ | √ | √ | √ |
Custom Variable | √ | √ | √ | √ | √ | √ |
Chatbot | √ | √ | √ | √ | √ | √ |
Visitor | √ |
|
|
|
|
|
Pre-chat | √ |
|
|
|
|
|
Ticket |
| √ | √ | √ | √ | √ |
Step by Step Instructions
To configure a Condition, follow these steps:
- Log in to your Comm100 Control Panel
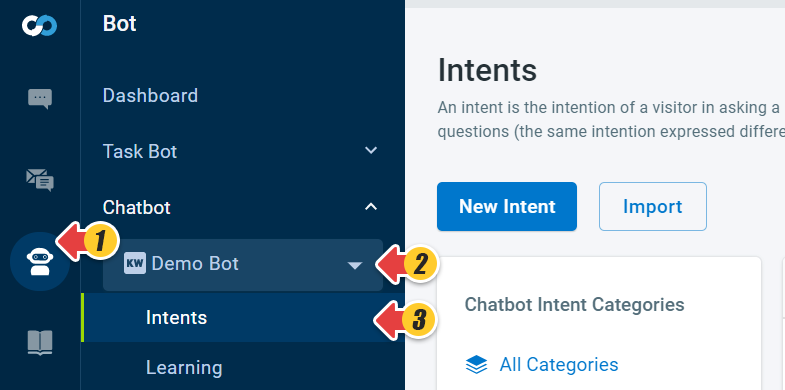
- From the left navigation menu, go to Bot > Chatbot.
- Select a bot from the drop-down list and go to Intents.Note: Ensure that you have also selected the same bot for your Live Chat campaign from the Live Chat > Campaign > Chatbot page to run the correct bot for the Conditions.
On the Intents page, you can either choose an Intent from the existing list or create a new Intent. Ensure that you have filled the Name, Category, and Questions fields of the new Intent before configuring the Conditions action in the Intents – Answers flow builder. For more information on Intents, see this article. - In this example, we choose an existing Intent to create a condition based on it for the Live Chat channel.
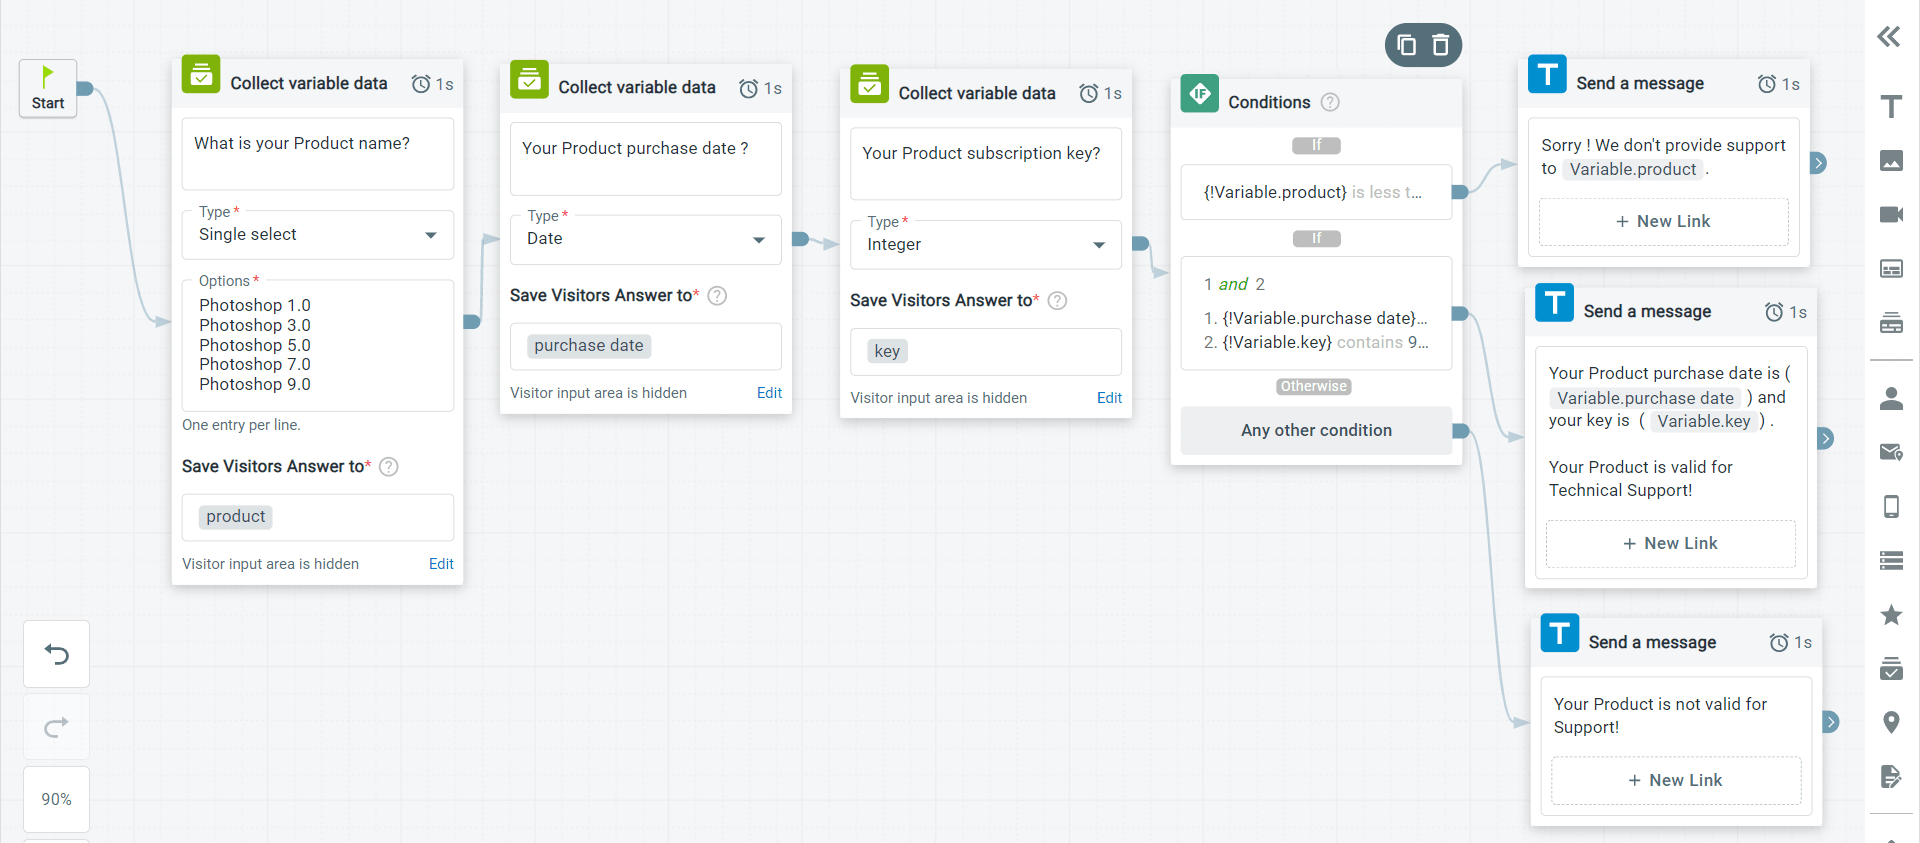
- Next, drag the Conditions card and link it with the Collect variable data.
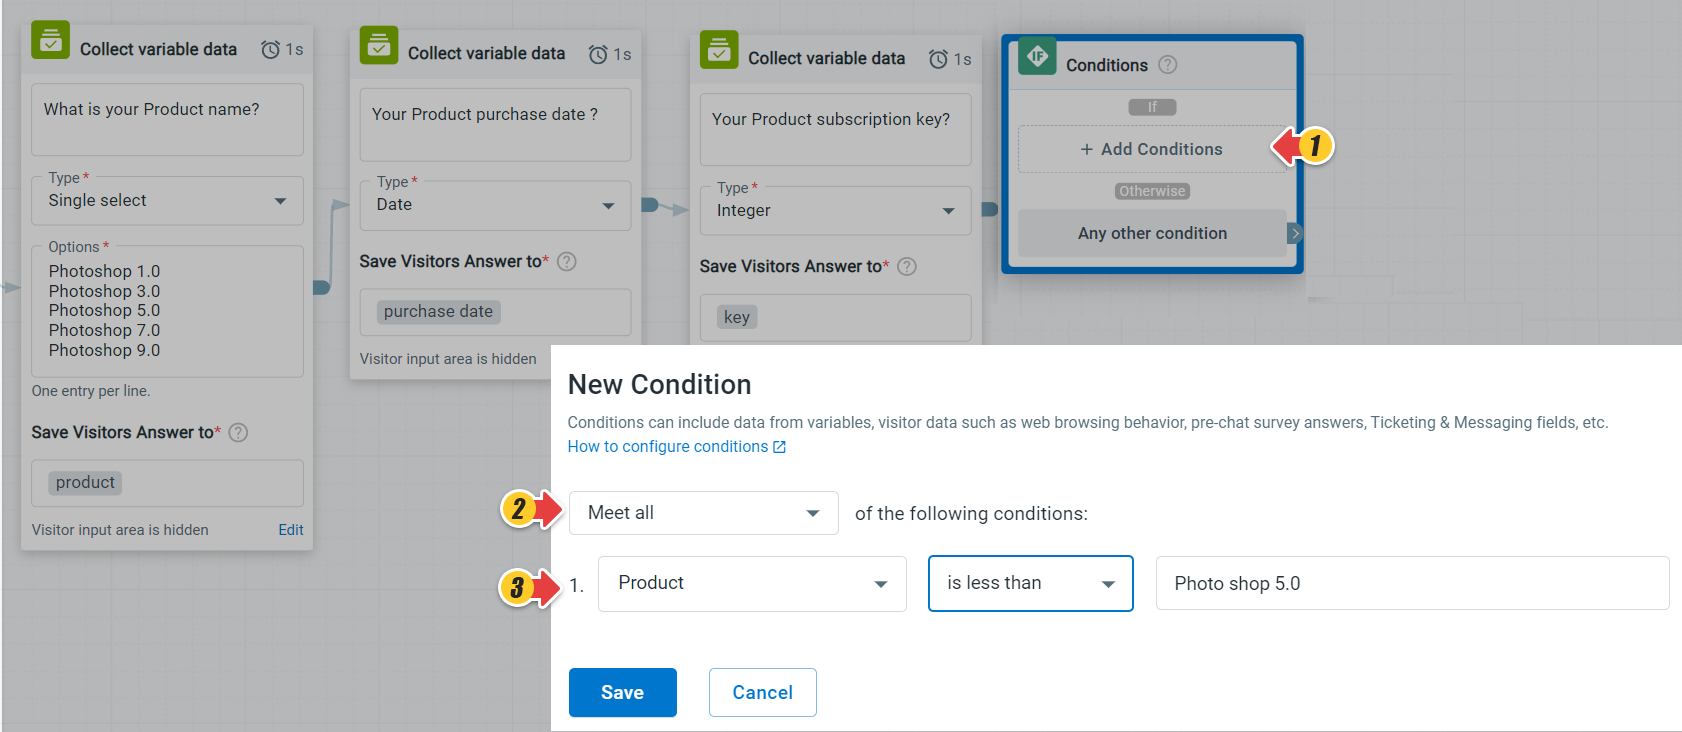
- Click Add Condition to open the New Condition drawer.
- Set up conditions based on your needs. Each Condition has its identifier. For complex conditions, you can use the Logical Expression. To learn how to set Logical Expression, see this article.
- Click Save.Note: You can create condition branches using the available fields and operator types, and in case you want to modify existing conditions, you can do it by clicking the same respective condition branch.
- Once your conditions are configured in the Conditions card, you can link other action cards with the branch in the chatbot workflow.
- Click Save & Leave.
Chatbot on Chat Window
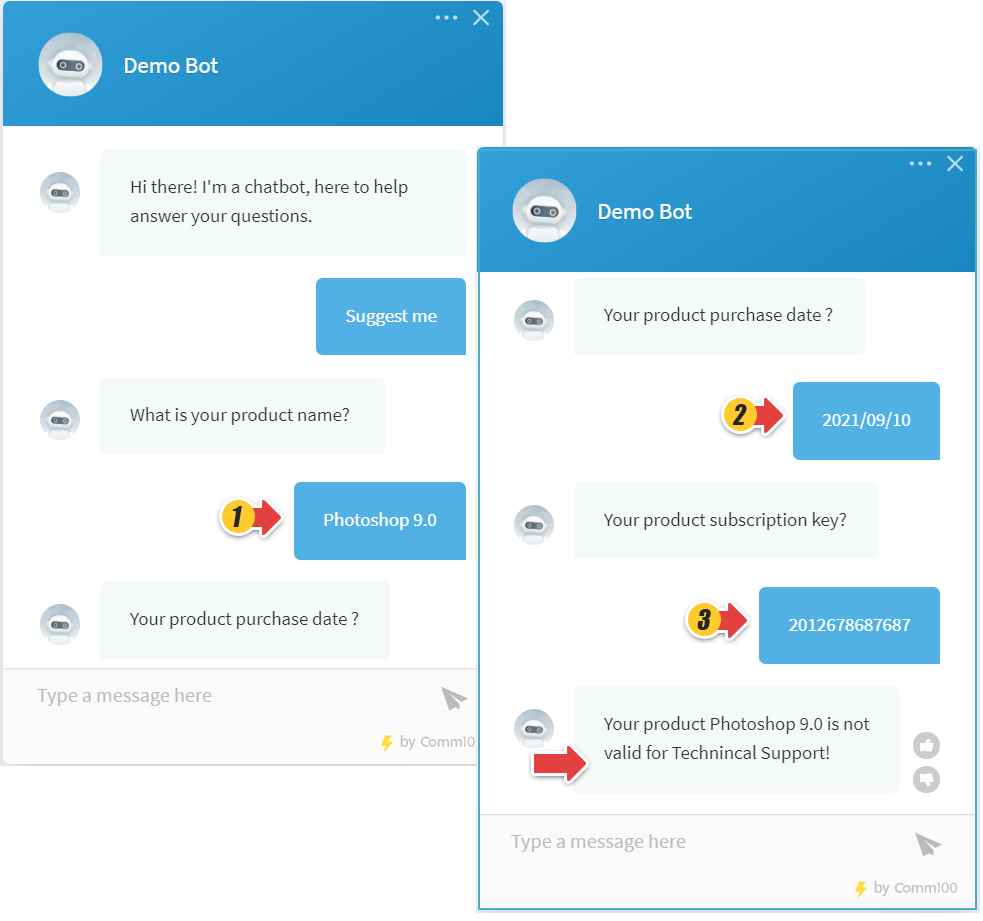
When a visitor contacts the business on their Live Chat, a Chatbot takes control of the Chat Window and executes the actions as per the visitor's response. A conversation between the visitor and the Chatbot happens based on the Condition configured in the Intents – Answers flow builder.
The following example cases show different outcomes based on the visitor's input.
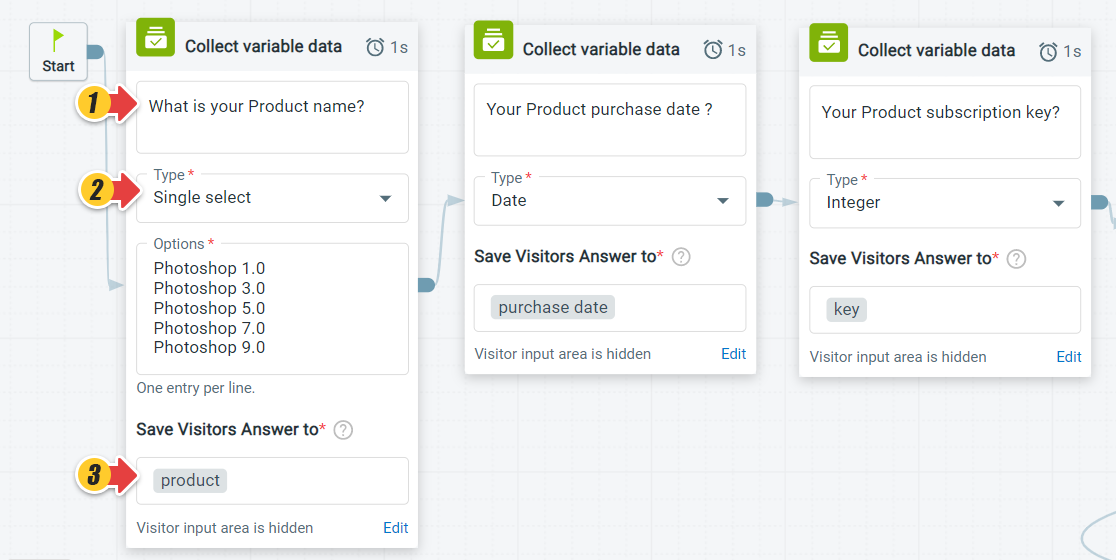
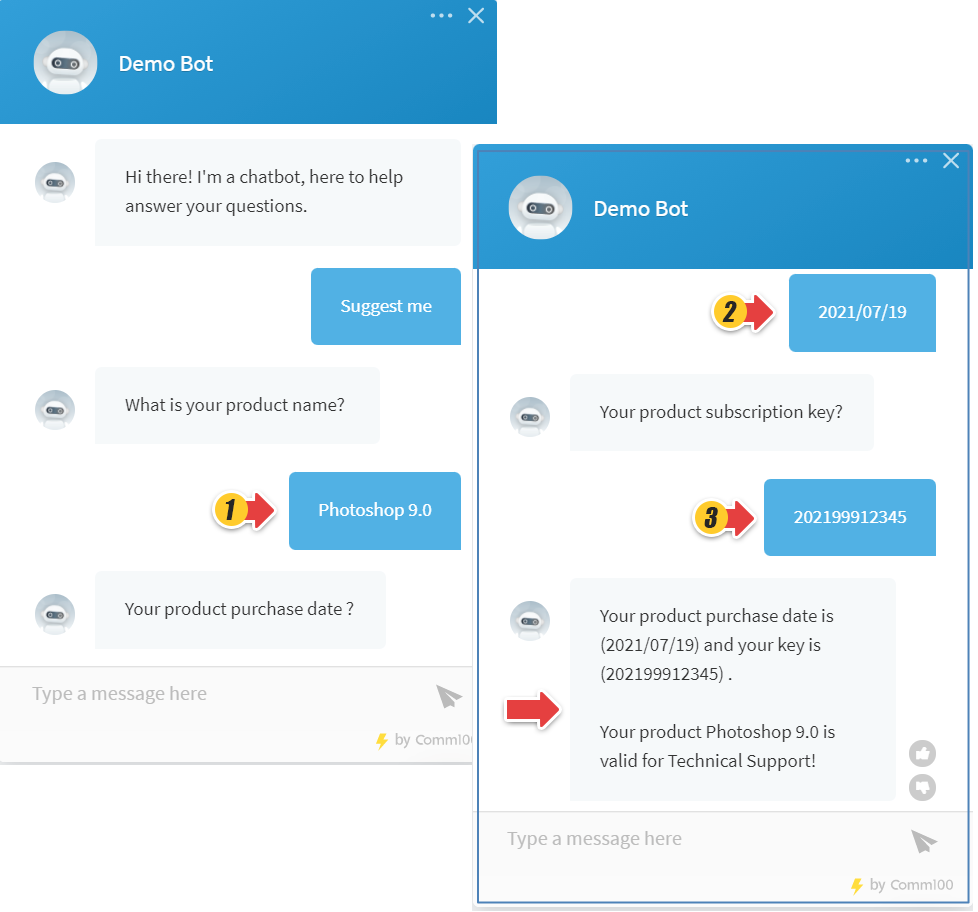
Case 1: Product name = Photoshop 9.0, Product Purchase Date = 2021/07/19, Product subscription key = 202199912345.
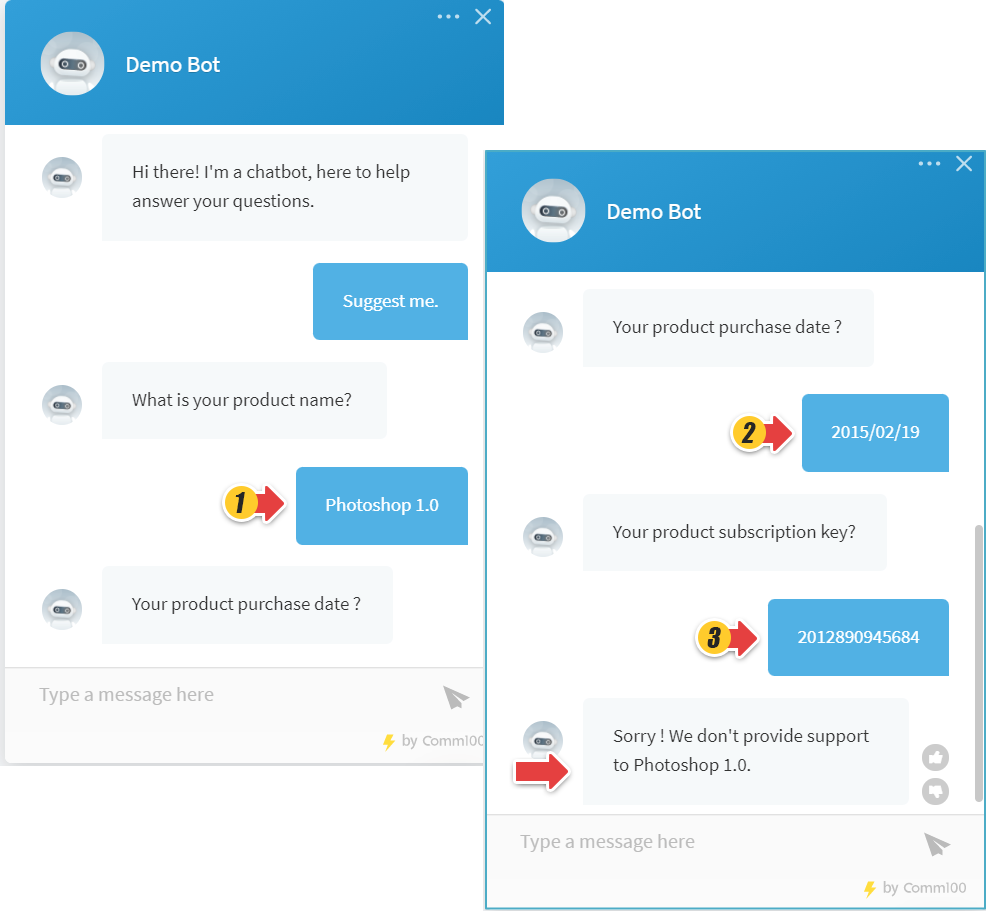
Case 2: Product name = Photoshop 1.0, Product Purchase Date = 2015/02/19, Product subscription key = 2012890945684.
Case 3: Product name = Photoshop 9.0, Product Purchase Date = 2021/09/10, Product subscription key = 2012678687687.